Quickstart for Galileo Landing Zones and Slurm
The following is a user guide for deploying a Galileo Landing Zone (LZ) in a Slurm cluster.
Prerequisites
A Slurm client must be installed on the machine you wish to use as a Landing Zone. It must be configured to correctly run basic commands like srun and squeue.
Singularity must also be installed on the cluster that you wish to target.
You can download the statically linked (amd64 Linux) Landing Zone executable here. Put this somewhere in your $PATH such that galileod --help runs successfully. In most circumstances we advise that a Landing Zone be executed inside its own container, however on Slurm systems it can be very difficult for a containerized Landing Zone to communicate with the Slurm controller. For this reason we suggest admins use the binary linked above on Slurm systems.
It is also assumed by the LZ that the work directory (-w, –work-dir) belongs to a distributed file system that is readable and writable by every node in the cluster. You can influence the default location ( /tmp) by setting the $TMPDIR, $TEMP, or $TMP environment variables.
Admins should read through the Slurm Configuration documentation to make sure memory, CPUs, and GPUs are allocated to jobs in mutually exclusive ways.
How It Works
The Galileo Landing Zone naturally lends itself to a clustered environment. In combination with our web application, it can be used as a user-friendly gateway to the cluster. It can also be submitted as a pilot job to the cluster so as to take advantage of Galileo’s station queueing systems.
As a Gateway
The Landing Zone can be run on the headnode of a cluster and interact directly with its pre-existing Slurm resource scheduler.
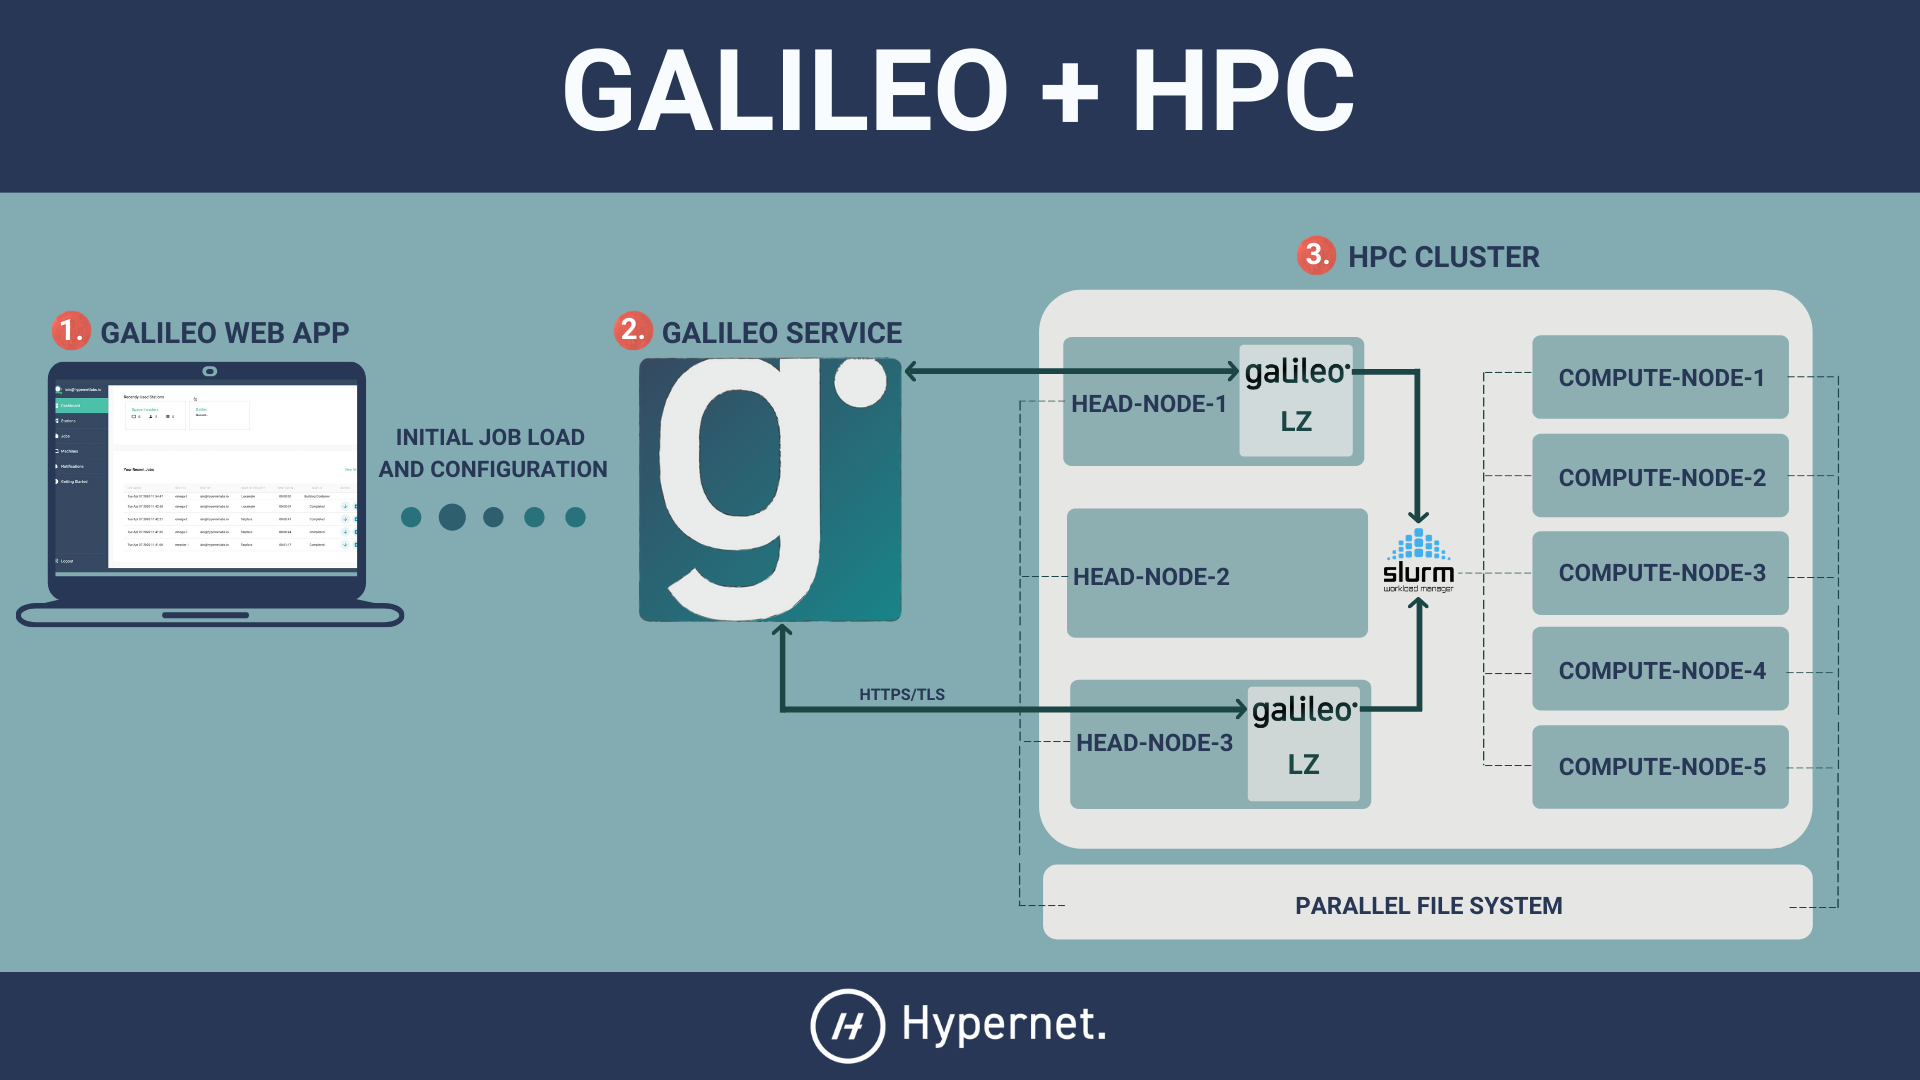
In the Slurm configuration the LZ receives the details of a job, builds a Singularity container for the job in /tmp, and issues an srun command to execute the container. Periodic calls to squeue and sstat are used to track the job’s progress. When the job finishes the LZ collects any new and modified files in the container and returns them to the user. Finally the LZ deletes any trace of the job’s container from the filesystem.
As a Pilot Job
An alternative way to use the Landing Zone in a clustered environment is to send a batch of Landing Zones to run in the cluster as pilot jobs.
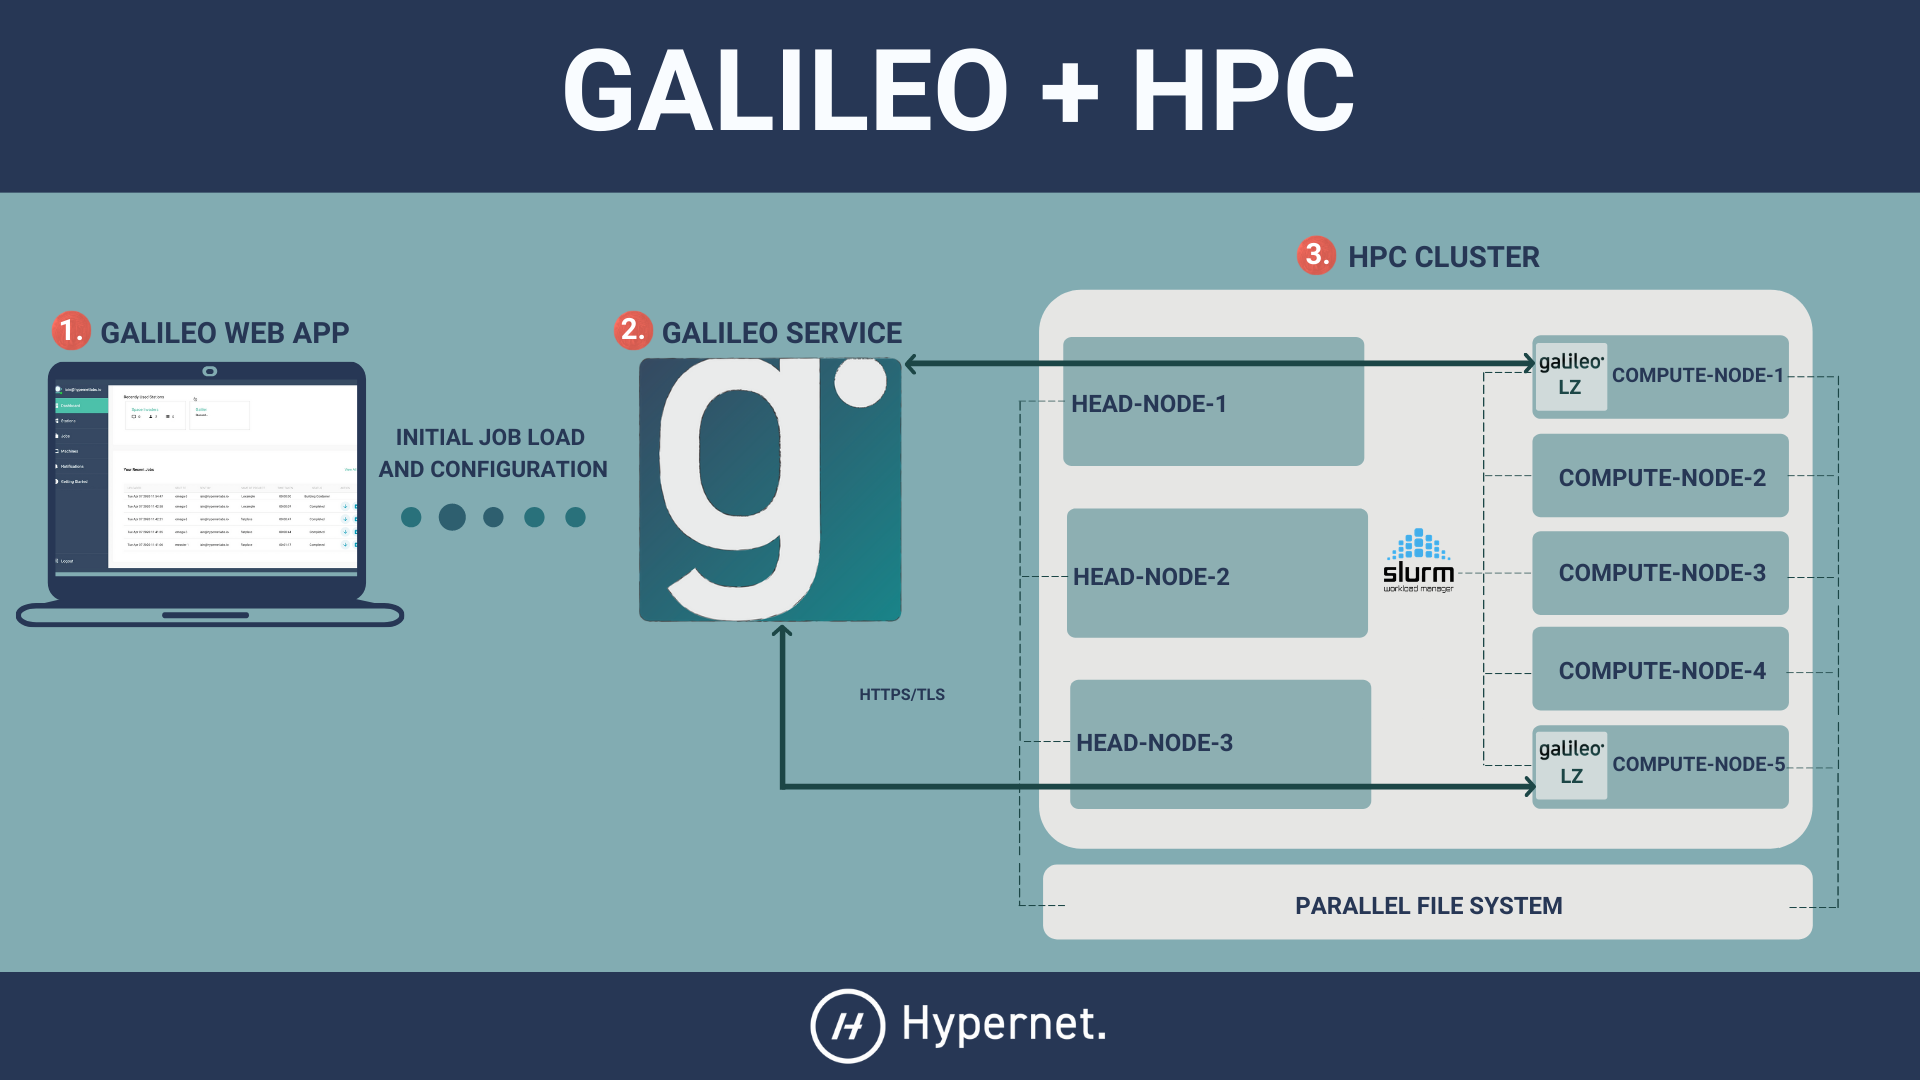
By submitting the Landing Zone as a job to the cluster, a user need only wait in the cluster queue once; thereafter they can skip the cluster’s queue and submit jobs directly to the LZ! Landing Zones in this circumstance will be running in a Singularity configuration.
Slurm Configuration
Memory
Ensuring that Slurm jobs are constrained to the memory limits set in Galileo requires the memory and memsw (swap) cgroups. The Slurm docs have an important note about these cgroups:
Debian and derivatives (e.g. Ubuntu) usually exclude the memory and memsw (swap) cgroups by default. To include them, add the following parameters to the kernel command line:
cgroup_enable=memory swapaccount=1This can usually be placed in /etc/default/grub inside the GRUB_CMDLINE_LINUX variable. A command such as update-grub must be run after updating the file.
Next you must tell Slurm to use cgroups for its task management services. In slurm.conf make sure TaskPlugin is task/cgroup or task/affinity,task/cgroup, and that the select type parameters includes memory, e.g. SelectTypeParameters=CR_Core_Memory. Any of CR_Core_Memory, CR_CPU_Memory, or CR_Socket_Memory will work; consult the slurm.conf man page to make a decision. Bear in mind the CPU settings in Galileo may get translated to srun ... -n <cpus> on the cluster. CR_Memory is discouraged since Galileo does attempt to set constraints on CPU/core usage.
Also check our cgroups.conf Recommendations for options affecting memory allotment and enforcement.
CPUs/Cores
Slurm does not always use the words “CPU” and “Core” consistently in their documentation. The definitions might even shift from one Slurm configuration to another.
To add to the confusion Galileo has its own concept of CPU settings that can be set in Mission and Job settings. This value gets translated into Slurm flags one of two ways, depending on whether the job requires distributed memory or not.
Non-distributed jobs translate the value into these flags
--ntasks 1 --cpus-per-task <cpus> --mem <memory>
Distributed jobs assume a one CPU default for tasks and translate the value into these flags
--ntasks <cpus> --cpus-per-task 1 --mem-per-cpu <memory / cpus>
How those flags affect actual hardware usage depends on your Slurm configuration. In particular, in slurm.conf, the value of SelectTypeParameters may be either CR_Core_Memory, CR_CPU_Memory, or CR_Socket_Memory (CR_<x>_Memory is required for enforcing Galileo’s memory constraints). Admins should refer to the slurm.conf man page to investigate the hardware implications of each of these.
Also check our cgroups.conf Recommendations for options affecting core allotment and affinity.
GPUS
Galileo’s support for GPU management in Slurm clusters hinges on the select/cons_tres plugin introduced in Slurm version 19.05. Admins should consult the Slurm documentation for correctly configuring this feature.
Also check our cgroups.conf Recommendations for options affecting GPU allotment.
cgroups.conf Recommendations
Setting TaskPlugin to task/cgroup enables a number of cgroup.conf constraints should be considered:
ConstrainCores:Ensures jobs get exclusive access to the cores allotted to them.
ConstrainRAMSpace,ConstrainKmemSpace, andConstrainSwapSpace:Ensures jobs will be preempted if they exceed their allotted memory. Note that
OverMemoryKillin slurm.conf is similar, but operates on a per-process basis instead of a per-job basis. That would be inappropriate because a job could use twice its allotted memory by utilizing two processes.
ConstrainDevices:Ensures jobs get exclusive access to the GPUs allotted to them.
TaskAffinity=no,ConstrainCores=yes, andTaskPlugin=task/affinity,task/cgroup:Officially recommended by slurm for setting default task affinity as well as exclusive core allotment.
Be sure to check the official documentation for other considerations.
How to Run the Landing Zone Daemon
As a Gateway
Choose the name you’d like this LZ to have when viewed in the Galileo web interface. We will refer to the LZ name as $LZ_NAME. When you see $LZ_NAME referenced, simply substitute your chosen name in its place.
You should invoke the LZ as follows:
$ galileod --container slurm --name "$LZ_NAME"
You should see some output that looks like this
Pulling updates…
Already up to date!
Please visit the following url in your browser and enter the code below
URL: https://galileoapp.auth0.com/activate
Code: XXXX-XXXX
Follow those instructions. Once you have confirmed your code at the provided URL you should see your new Landing Zone appear in the Galileo Landing Zones tab! In order to submit jobs to your new LZ, you must add it to a Station. You can create a new Station by going to the Stations tab and clicking the Create Stations button.
As a Pilot Job
Choose the name you’d like this LZ to have when viewed in the Galileo web interface. We will refer to the LZ name as $LZ_NAME. When you see $LZ_NAME referenced, simply substitute your chosen name in its place.
Submit the Landing Zone as a job to to the cluster. Be sure to specify stdout redirection so that you can read it later.
$ srun -o landing-zone-daemon.out singularity run --fakeroot library://hypernetlabs/default/landing-zone-daemon landing-zone-daemon --name "$LZ_NAME"
Now that the LZ is running, we must authenticate it against your account. Run this command in your terminal
$ cat landing-zone-daemon.out
This should give you some output that looks like this
Pulling updates…
Already up to date!
Please visit the following url in your browser and enter the code below
URL: https://galileoapp.auth0.com/activate
Code: XXXX-XXXX
Follow those instructions. Once you have confirmed your code at the provided URL you should see your new Landing Zone appear in the Galileo Landing Zones tab! In order to submit jobs to your new LZ, you must add it to a Station. You can create a new Station by going to the Stations tab and clicking the Create Stations button.
As a Batch of Pilot Jobs
You will need a naming pattern to uniquely identify the batch of LZs when viewed in the Galileo web interface. The recommended approach is to use a job array and some pattern based on the $SLURM_ARRAY_TASK_ID. Whatever you decide it needs to be used with galileod’s --name flag.
It is also recommended that you generate a persistent authentication token as a prerequisite and pointing your batch LZs at it with the --token flag.
Create a job submission file with contents similar to the following. Please adjust the values to fit your needs and circumstances. Assume the name of this file is
landing-zone-daemon.batch
#!/bin/sh
#SBATCH --job-name=batch_pilot_landing_zones
#SBATCH --output=/tmp/galileod_%a.out
#SBATCH --error=/tmp/galileod_%a.err
#SBATCH --array=0-3
#SBATCH --ntasks=1

srun \
singularity run --fakeroot \
library://hypernetlabs/default/landing-zone-daemon \
--name pilot_$SLURM_ARRAY_TASK_ID \
--token /tmp/token
Submit the batch with this command
$ sbatch landing-zone-daemon.batch
In order to submit jobs to your new LZs you must add them to a Station. You can create a new Station by going to the Stations tab and clicking the Create Stations button.
And of course you can stop your Landing Zones using the
scancelcommand
$ scancel --name batch_pilot_landing_zones